Build Your First Plugin
This Quickstart guides you through building your first plugin using our Simple Plugin Example example project.
Prerequisites
Are you a financial institution?
If you are a financial institution or working directly with a financial institution, you should work with
the back office administrator at your institution to get appropriate access to Banno People.
Are you a fintech or independent developer?
If you are a fintech or other developer working without a financial institution, you are likely using the
JackHenry.Dev developer portal. In this case, you will not have access
to Banno People, however you will still have the ability to create and configure many aspects of your
external application and plugin.
For more information on this, see our troubleshooting page.
When referencing Banno People it’s important to understand that the intent is to point you towards the place where you can update configurations. If you are using JackHenry.dev the experience will be slightly different.
This quickstart uses localhost. When you move to production, your session strategy affects your hosting choice.
Only applies if your plugin needs to write cookies in Production: Safari (and other browsers) may treat iframe set cookies as third-party. Host the plugin’s public-facing web server as a subdomain of the institution’s Banno Online domain to represent the cookie as a first-party cookie. Since our auth flow uses cookies, this is advised.
Learn more: Authentication.
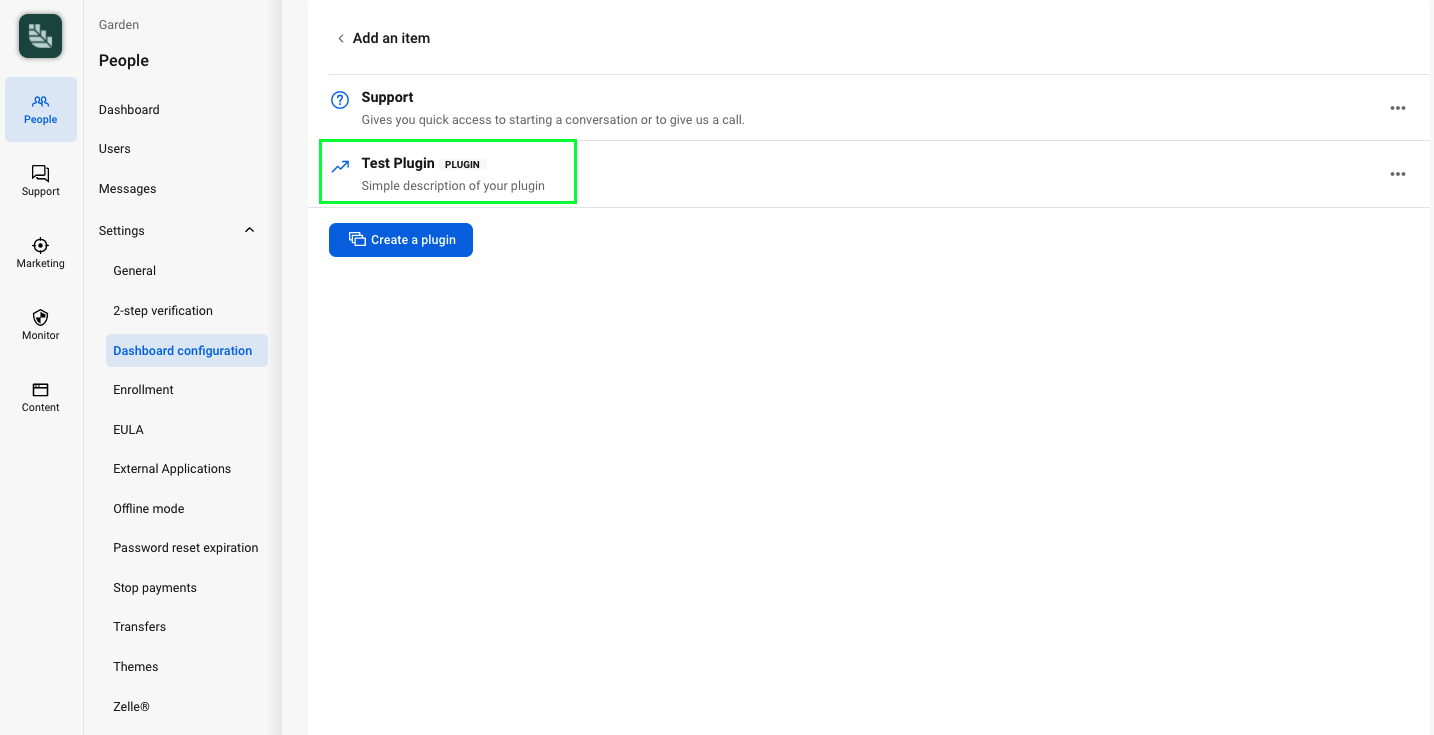
Configure the plugin
External application
You’ll need to configure an External Application in the External applications section of the Banno People app.
For this example, change the following values:
- Create a new external app
- Enter a custom name (ex. First demo plugin)
- Uncheck User consent required (since we are building a Plugin Card)
- Click Save
- After clicking Save, you will be redirected back to the list of external apps, open your new app from the list
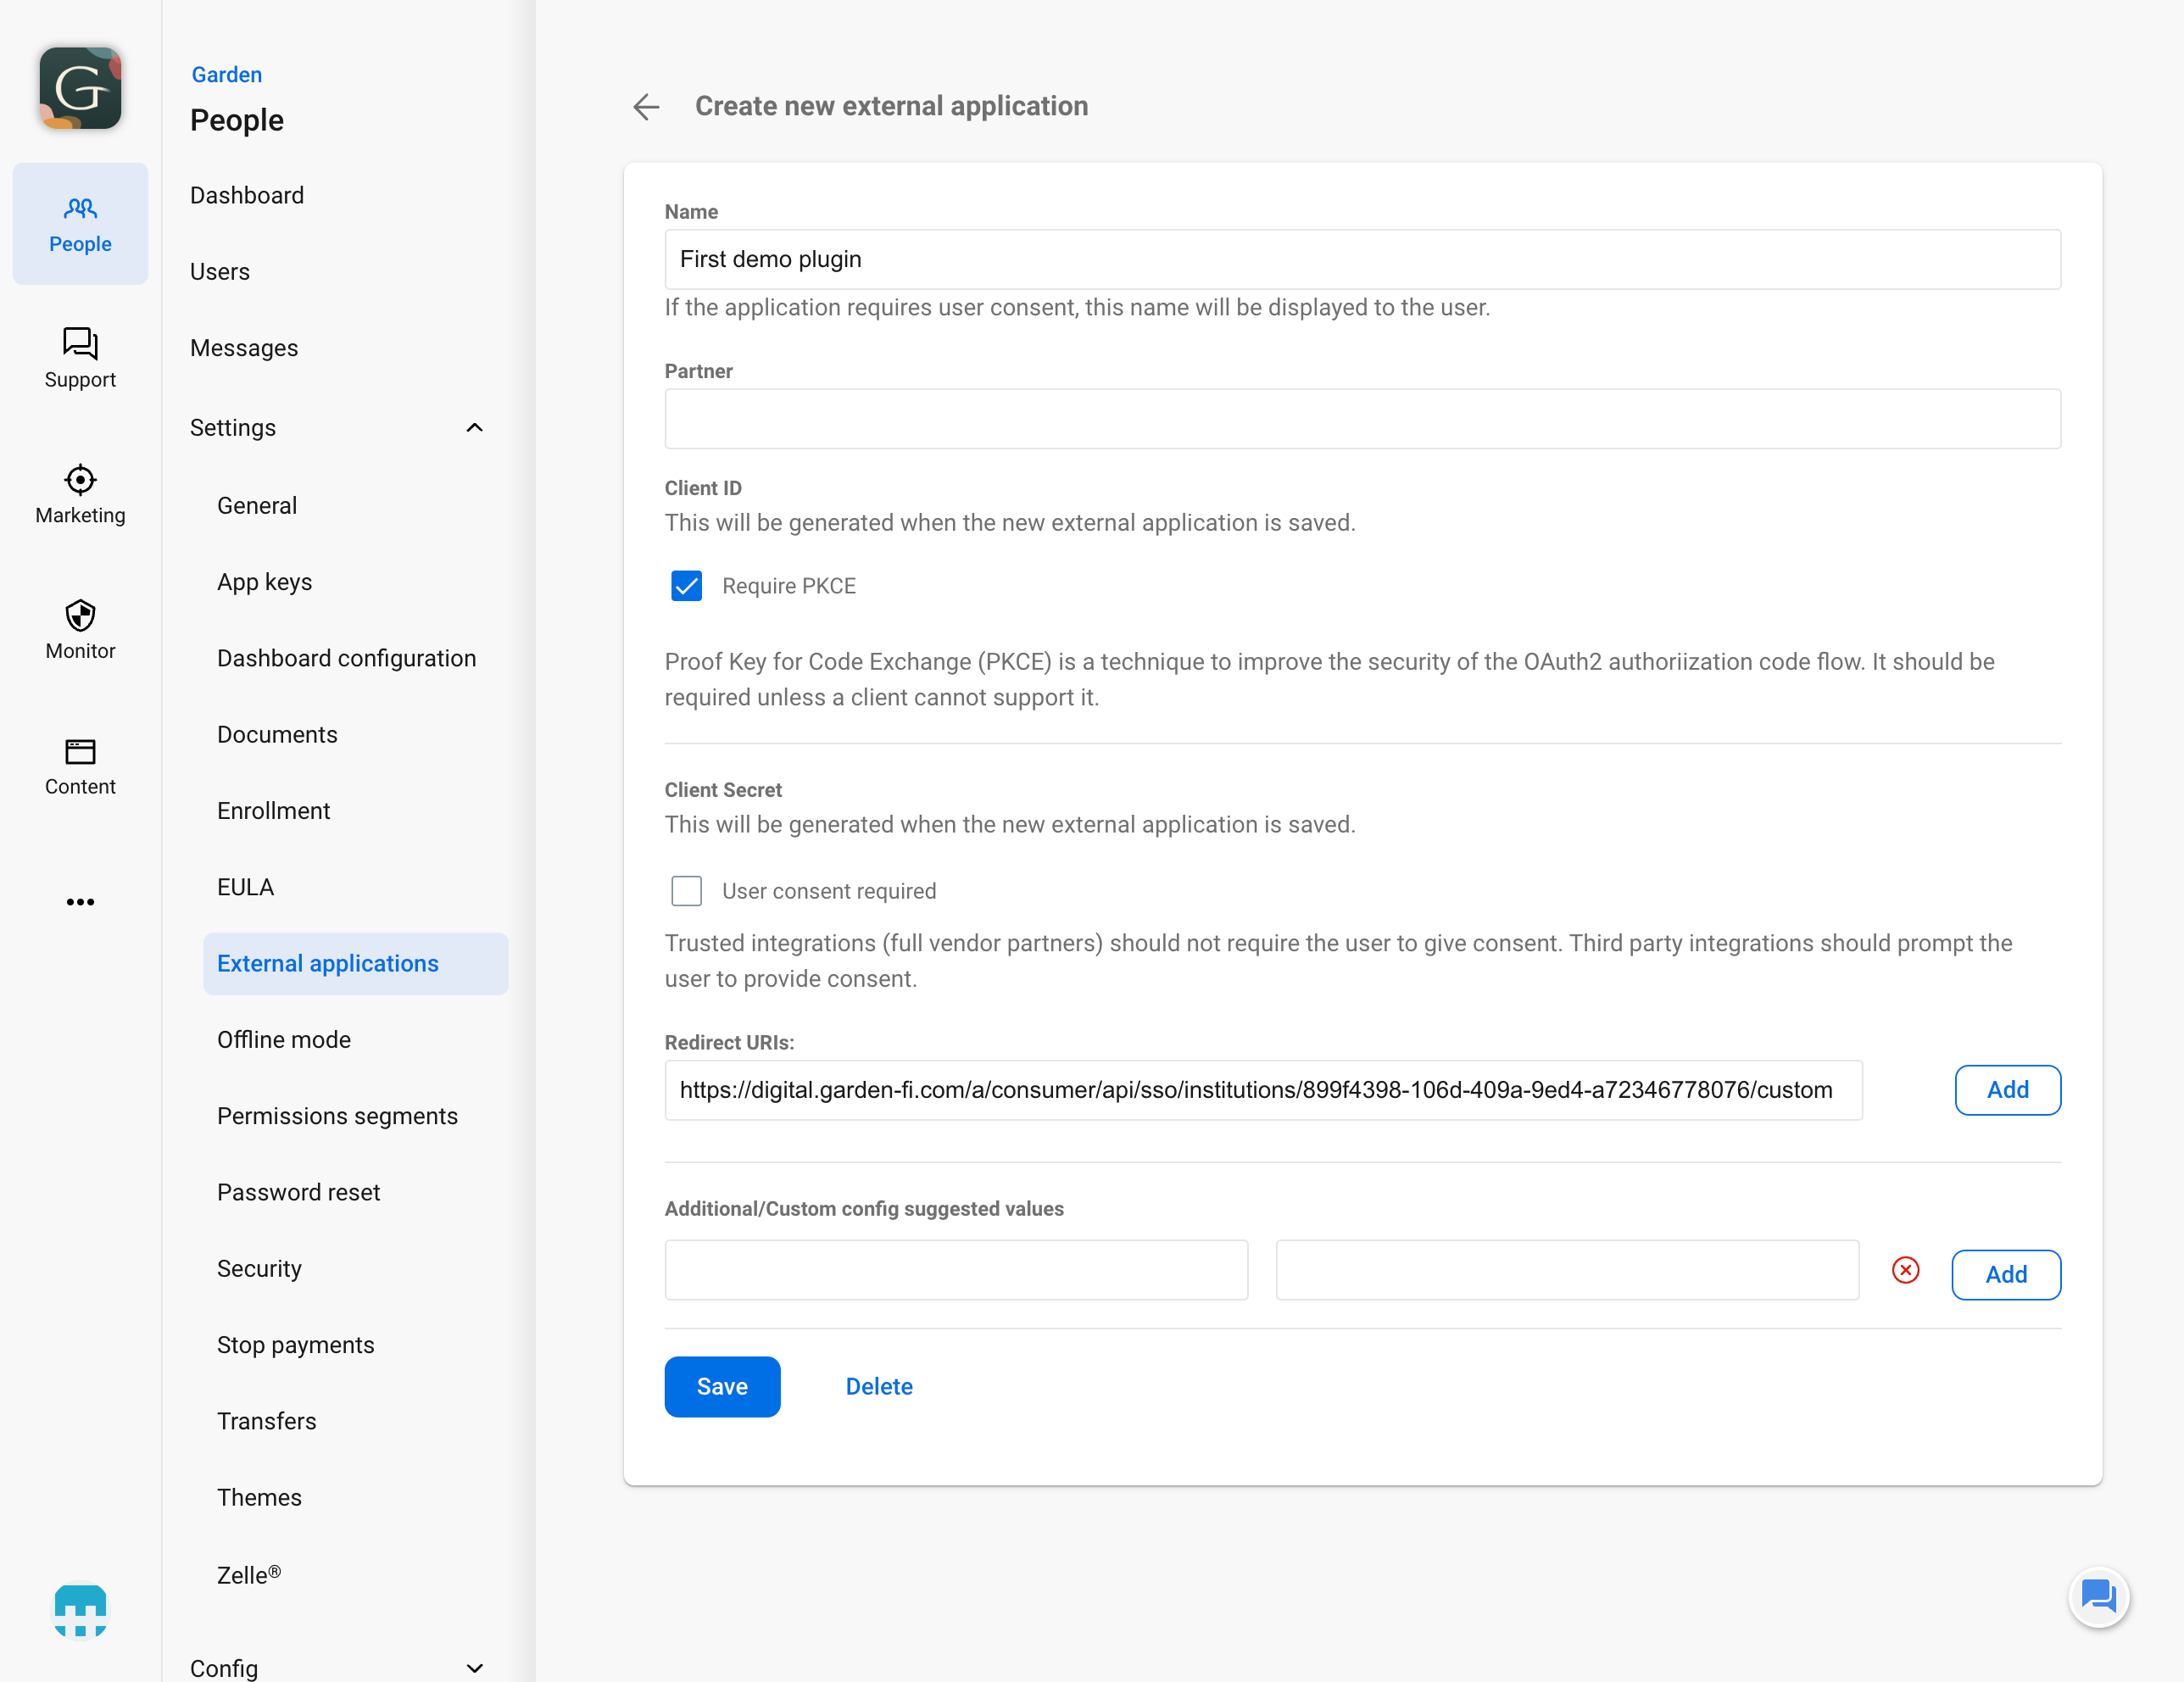
- Select PluginCard as the link type
- Enter a title for the link (ex. Test Plugin)
- Enter http://localhost:8080/static for the redirect URI (Note: You may need to change this if you alter the port number later)
- Click Add Scopes and search and select Profile, and
https://api.banno.com/consumer/auth/accounts.readonly(openidis automatically selected). - Select Link Enabled to enable the plugin for users
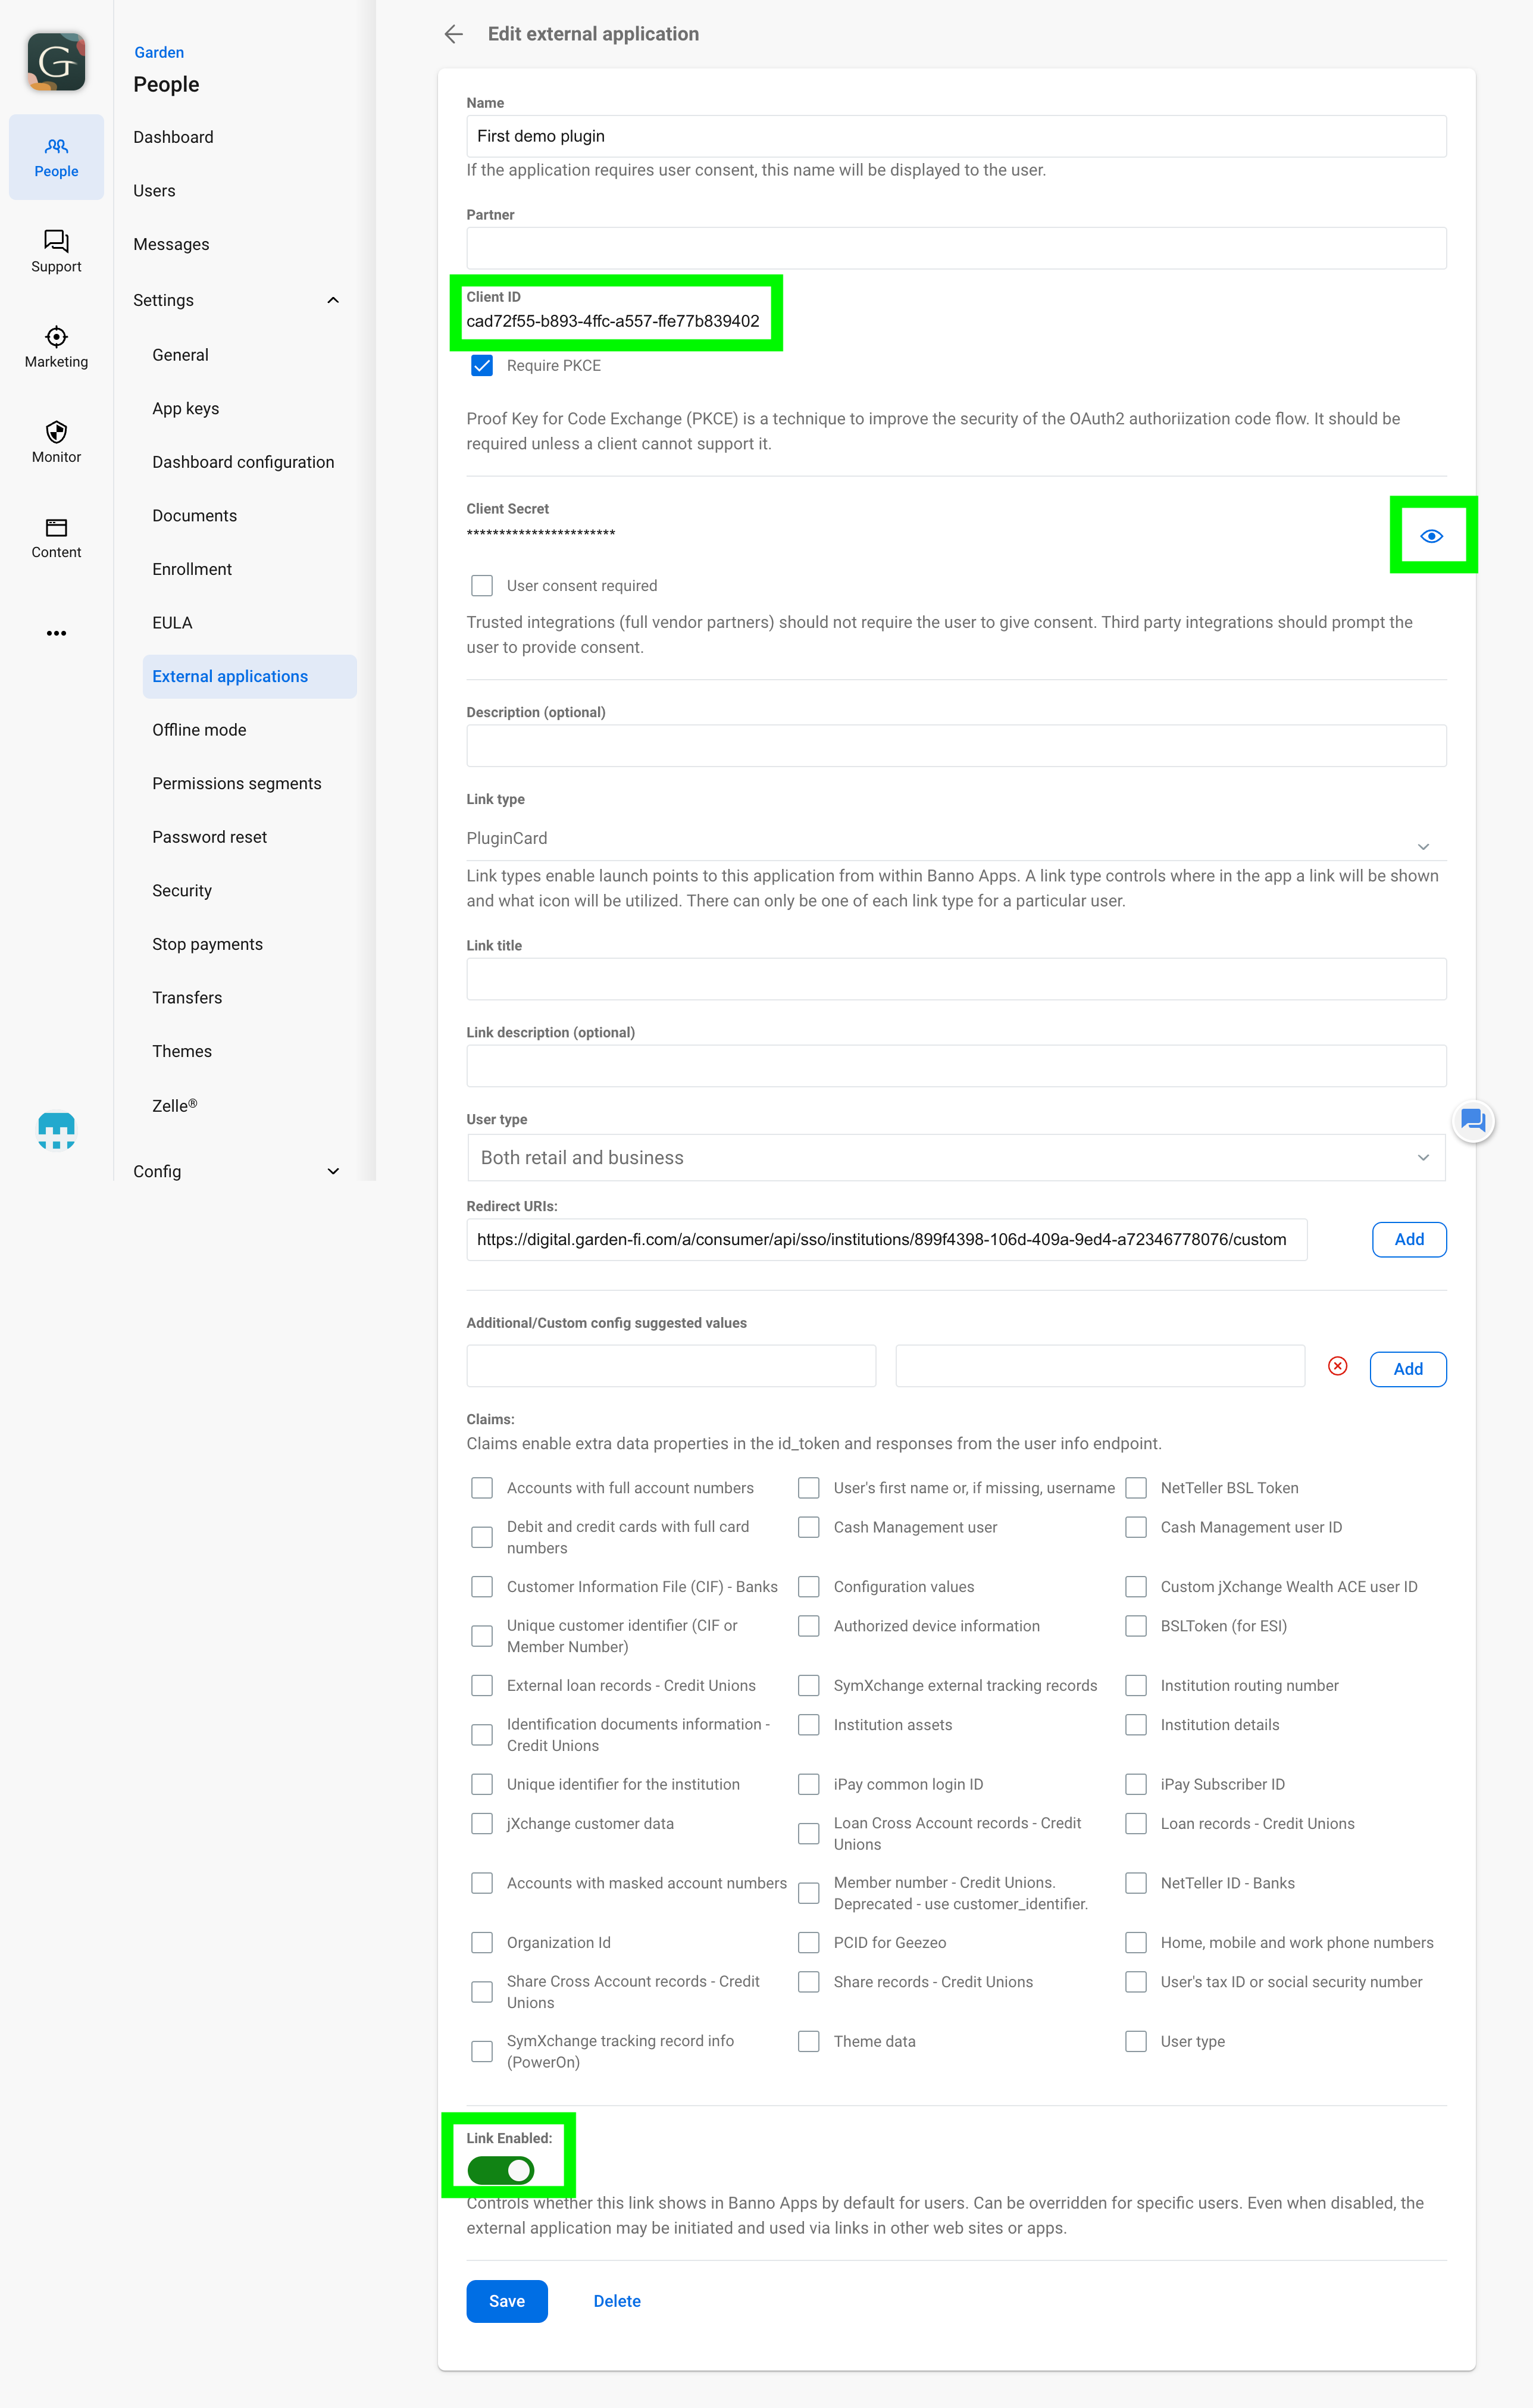
When you click the save button, the credentials will be saved along with these auto-generated values that you will need in later steps:
- Client ID
- Client Secret
Plugin configuration
Required steps
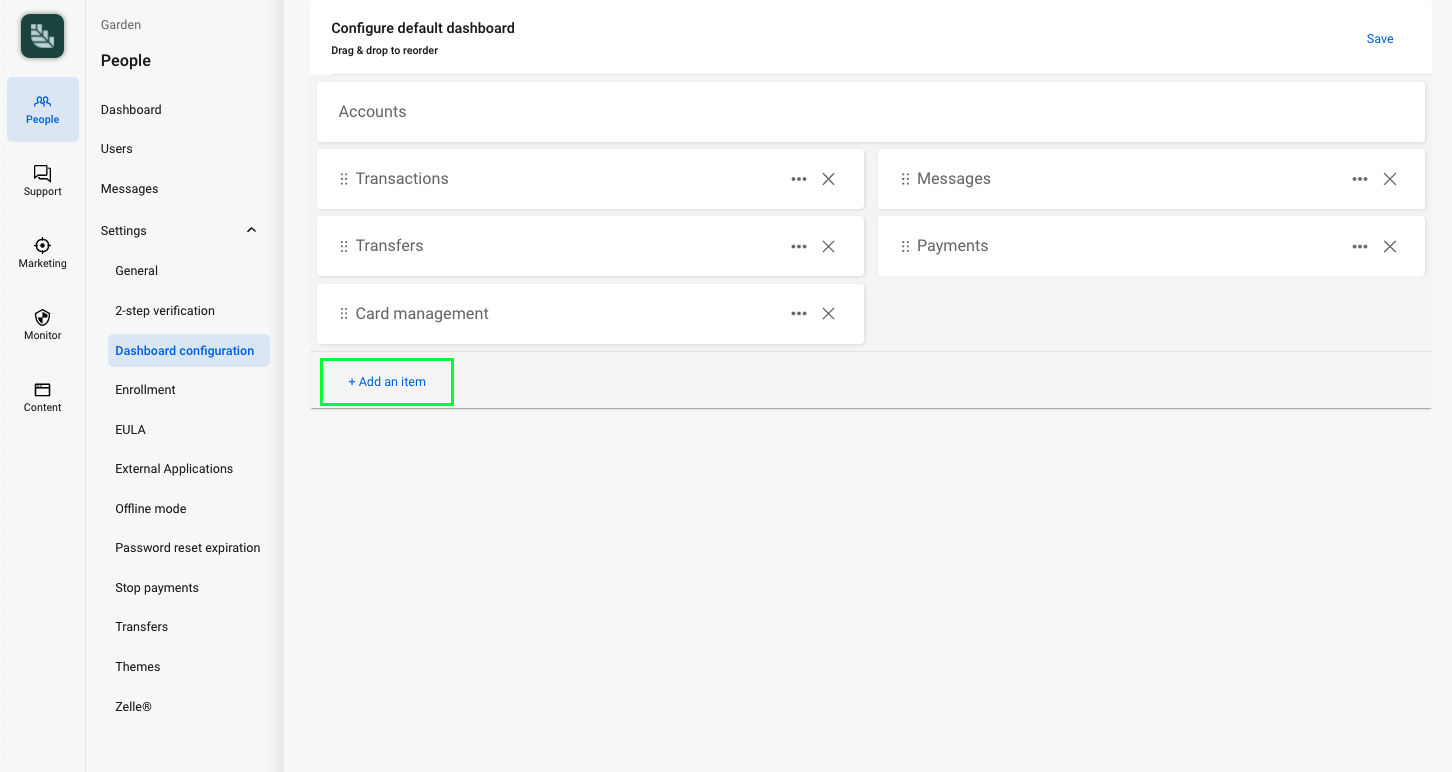
You’ll need to create the Plugin Configuration in the Dashboard configuration section of the Banno People app.
- Click Add an item to add a new item to the dashboard configuration
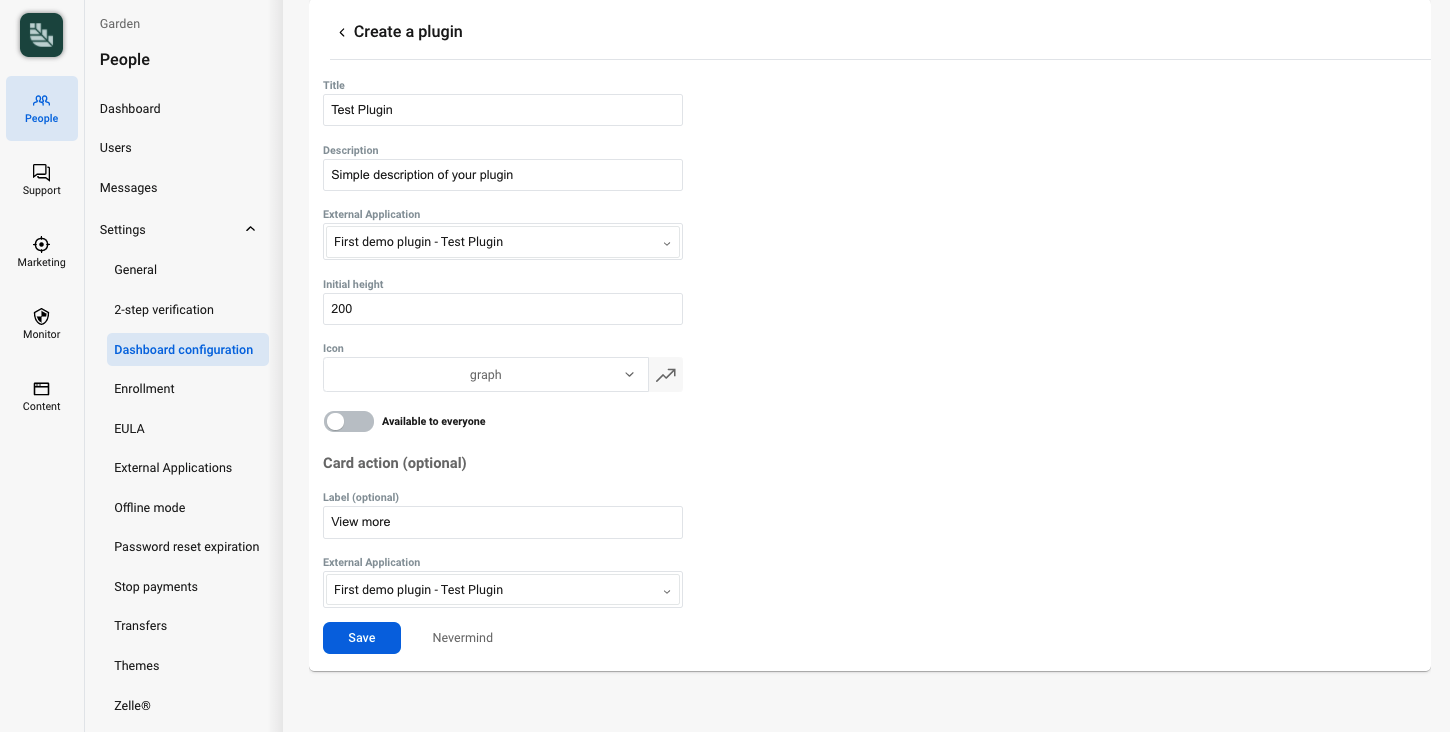
- Scroll to the bottom and click Create a plugin
- Title: Test plugin
- Description: Demo quickstart plugin
- External Application: First demo plugin - Test Plugin (This is the name we used when configuring the external application above)
- Initial height: 200
- Icon: graph (this can be anything)
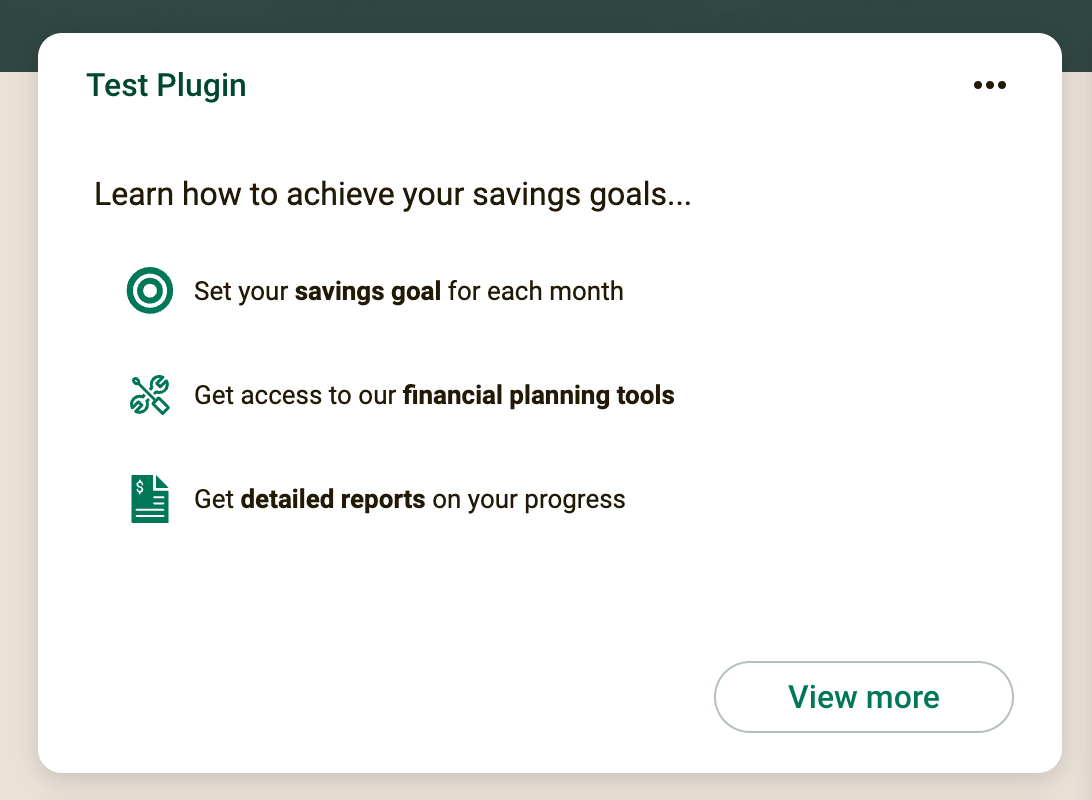
Optional steps
For this example, change the following values:
- Label: View more
- External Application: First demo plugin - Test Plugin
Dashboard configuration
Clicking the save button will create the plugin configuration.
The administrator can make it available for your users to add to their dashboard.
- Click Add an item again – this time select the plugin you created
- Make sure to click Save to preserve your new dashboard configuration
Enable plugin card for user
As mentioned in the note above, if you don’t want the plugin enabled for ALL users, we need to select which users to enable the Plugin Card for.
- From Banno People, click the Users and search by username.
- Click on the user
- Click Permissions
- Find and enable the plugin under Plugin cards

The user will now have the plugin available to them in the Banno Online dashboard.
Running the plugin
Simple plugin example
Start by cloning the repository, Simple Plugin Example.
The code
This is, as the name describes, a very simple plugin example. It’s designed to showcase the essential parts of building a plugin, and equip you to get started building your own. Let’s break down a few key parts of the code.
config-EXAMPLE.js - you will want to rename this file to config.js, we will provide the necessary configuration elements in the step below.
server.js is the primary driver of the entire plugin, it is an Express.js server application. We have exposed a /static and /auth endpoint to the server which are used as the callback URI (the static endpoint we will use to make sure everything is configured correctly, then we will use the auth endpoint to make API calls and fill the plugin with dynamic data). When a request is sent to /static a simple, static HTML page is rendered in response. When a request is sent to the /auth endpoint, we’ll do a series of operations to authenticate the user, then retrieve information about the authenticated user.
routes/auth.js defines authentication-related endpoints (/ and /callback resolves to /auth/ and /auth/callback). Routes requests to the appropriate controller functions for OAuth flow handling. Acts as a clean separation between URL routing logic and business logic implementation.
controllers/authController.js contains the core authentication logic with initAuth and handleCallback functions. Manages the complete OAuth/OIDC flow including PKCE security, state management, and token exchange with the Banno API. Constructs authorization URLs, validates callback parameters, fetches user account data, and renders dynamic content with user information.
utils/pkce.js implements PKCE (Proof Key for Code Exchange) security utilities for OAuth. Generates secure code verifiers and challenges to prevent authorization code interception attacks. Uses SHA256 hashing and base64url encoding to create the code challenge from the verifier.
utils/state.js provides state parameter generation for OAuth security. Creates random state values used to prevent CSRF attacks during the authorization flow. Generates secure random strings that are verified during the callback to ensure the request originated from the same client.
utils/tokenService.js handles the OAuth token exchange operations with the authentication server. Takes authorization codes and exchanges them for access tokens and decoded ID tokens. Makes POST requests to the OIDC token endpoint with client credentials and PKCE verification, then decodes JWT tokens for use in the application.
Setup
Before we run the application, we need to make sure that all the dependencies are available.
Install dependencies:
npm install
Running the static plugin
Start the server:
npm run start
The server will now be running locally. You’ll see this log statement in the terminal:
App running at http://localhost:8080
Banno Online
User’s dashboard
You’ll need to add the plugin to your user’s dashboard.
Do these steps:
- Log into Banno Online
- Click on Organize dashboard
- Click on Add a card
- Click on Test plugin
- Click the back arrow on Add a card in the navigation header
- Click the done button on Organize dashboard
Back to Banno Online
When you navigate back to Banno Online, you can see that the plugin now displays the static HTML.
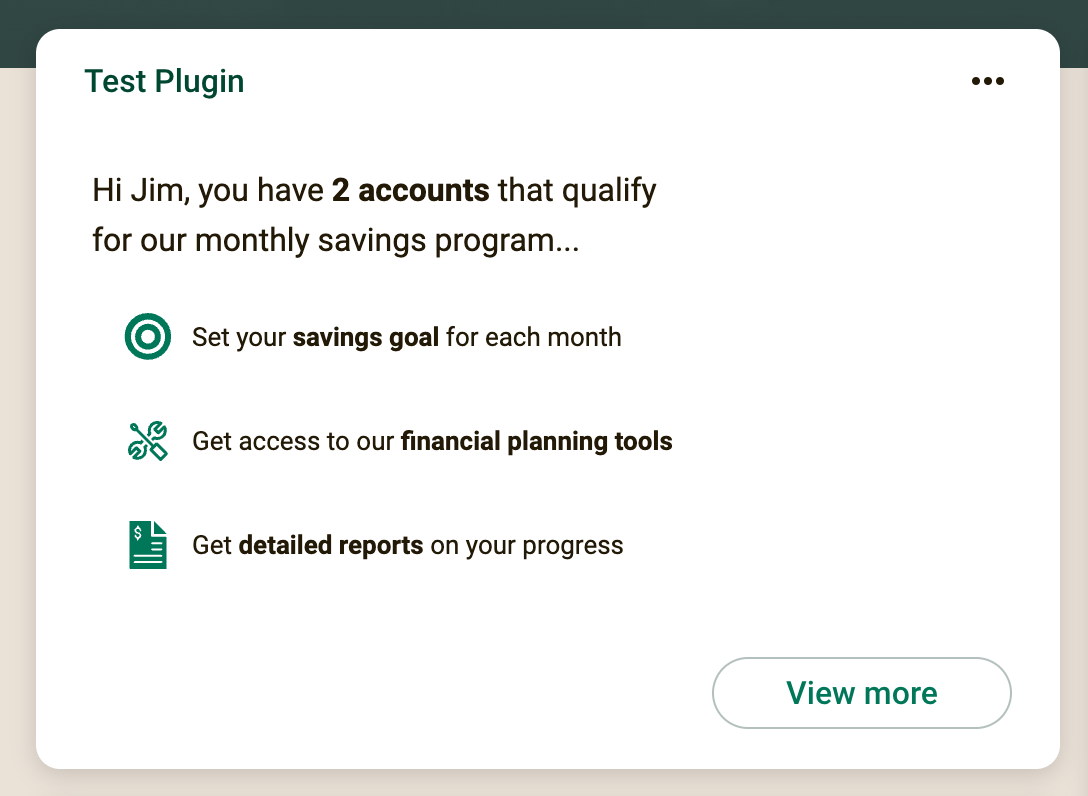
Running the dynamic plugin
Configuration
Now that the static plugin is running, let’s make it dynamic! First, we need the Client ID and Client Secret from the External Application that was configured above.
Find the config.js (make sure you have already renamed the example config file to just config.js) in the project’s folder. Change the following values in that file:
- client_id: Use your Client ID value
- client_secret: Use your Client Secret value
- environment: Use your Banno environment deployment location
Now, return to the Banno People External Application, change the primary redirect URI from http://localhost:8080/static to http://localhost:8080/auth, you also need to add another secondary redirect URI for **http://localhost:8080/auth/callback.
It should look like this (in order):
http://localhost:8080/authhttp://localhost:8080/auth/callback
Finally, restart the plugin server:
npm run start
Now, navigate back to Banno Online dashboard, you can see that the plugin now greets the authenticated user by name and displays the number of accounts associated with the user.
You have successfully built your first plugin!
Next steps
Congratulations! Continue your learning journey:
- Have a how-to question? Seeing a weird error? Get help on StackOverflow.
- Register for the Developer Office Hours where we answer technical Q&A from the audience.